The DNS (Domain Name Server) :-
directs your browser to websites when you type a URL, but the one used by
your ISP may not be your best option.
we will use a small program called "DNS jumper" to speed up your browser,
DNS jumper scans for the fastest DNS and switches automatically to it so
follow these steps:-
1.download DNS jumper (link will be provided down) and extract all the files
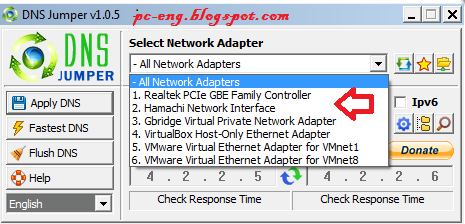
and run it. Under Select Network Adapter, click the arrow for a list of your
available adapters, including LAN (wired) network and Wi-Fi. The folder icon
shows your network connections. Click the arrows to refresh the list.
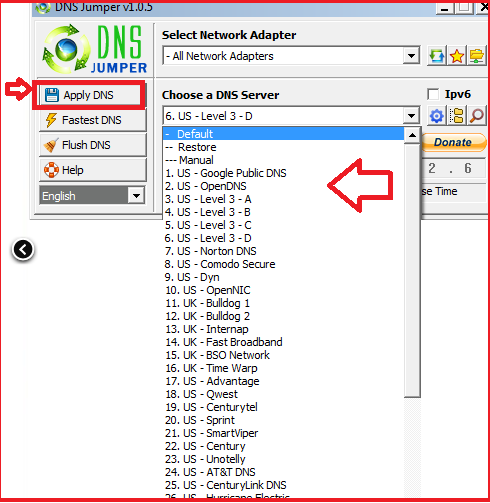
2. Under ‘Choose a DNS Server’, click the arrow to open a list of available
servers. Default is the DNS server chosen by your ISP. If you know which
server you want, select it and click Apply DNS. To return to the default at
any time, click the star icon and choose Default DNS.
3. Click Fastest DNS to find the fastest server based on your location. In the
window that opens, click the boxes next to the servers you want to compare.
Click Find Fastest DNS to run a test of each server’s reaction time, Select
your choice and click Apply Fastest DNS.

4. To remove servers from the list, click the cog icon to open the DNS
Settings. Select a server and click Delete. To edit one, select it and click Add.
To add a server, click Add and type its name and address. Click the Row
arrows to move a server up or down the list.

5. You can choose to clear your DNS cache each time you close the program.
To clear it immediately, click Flush DNS on the main screen. To return to your
original settings, Click the star, then Restore.

directs your browser to websites when you type a URL, but the one used by
your ISP may not be your best option.
we will use a small program called "DNS jumper" to speed up your browser,
DNS jumper scans for the fastest DNS and switches automatically to it so
follow these steps:-
1.download DNS jumper (link will be provided down) and extract all the files
and run it. Under Select Network Adapter, click the arrow for a list of your
available adapters, including LAN (wired) network and Wi-Fi. The folder icon
shows your network connections. Click the arrows to refresh the list.
2. Under ‘Choose a DNS Server’, click the arrow to open a list of available
servers. Default is the DNS server chosen by your ISP. If you know which
server you want, select it and click Apply DNS. To return to the default at
any time, click the star icon and choose Default DNS.
3. Click Fastest DNS to find the fastest server based on your location. In the
window that opens, click the boxes next to the servers you want to compare.
Click Find Fastest DNS to run a test of each server’s reaction time, Select
your choice and click Apply Fastest DNS.
4. To remove servers from the list, click the cog icon to open the DNS
Settings. Select a server and click Delete. To edit one, select it and click Add.
To add a server, click Add and type its name and address. Click the Row
arrows to move a server up or down the list.
5. You can choose to clear your DNS cache each time you close the program.
To clear it immediately, click Flush DNS on the main screen. To return to your
original settings, Click the star, then Restore.
Enjoy your fastest Faster web browsing.
Download DNS Jumper


0 comments:
Post a Comment